Tuesday, December 22, 2015
Thermal Camera Drone by DJI & FLIR
FLIR Systems, Inc. announced a new technology collaboration with DJI Innovations. Under the strategic arrangement, the companies also announced plans to develop their first joint product, the DJI Zenmuse XT stabilized camera featuring FLIR’s thermal imaging technology for DJI’s Inspire 1 and Matrice aerial platforms.
Combining DJI’s Zenmuse stabilized micro-gimbal technology, which has become a common platform for demanding aerial cinematography, with FLIR’s popular Tau 2 thermal imaging camera core, the Zenmuse XT will expand the possibilities for commercial drone operators and infrastructure inspectors. Using FLIR thermal imaging on small drones brings new capabilities to dozens of commercial applications, including search and rescue, firefighting, agriculture, wildlife protection, and the inspection of energy infrastructure, bridges, and buildings.
Thursday, December 10, 2015
Status Field Workflow in Cumulus 10
In this demo, we will show how to setup custom workflow fields to let the user know whether an asset is ready for editing.
STEP 1: Create a new Metadata Template in Preferences -> Metadata Templates. With the "Default Metadata Template" selected, click "Duplicate". Give the new template a name and enable the "Allow sharing" checkbox, and click "OK". In this example, I use the name "Demo Edit Status"

STEP 2: Go to Preferences -> Catalog Settings -> Record Fields -> Add Field... Select "Custom Field" tab and use Field Type -> String List. Enter a Field Name, example "Demo Image Status", and click "OK".

STEP 3: Highlight your new record field, and click "Properties..."

STEP 4: Go to the "String List Editor" tab and add the status values you want. Here I use two values, "Do Not Edit" and "Ready For Edit"

STEP 5: Organic bespoke umami quinoa cliche try-hard viral PBR&B 90's gastropub slow-carb portland readymade.
**image**
STEP 6: Shabby chic portland cardigan marfa kale chips.
**image**
STEP 7: Tweed letterpress hashtag organic next level typewriter green juice trust fund brooklyn you probably haven't heard of them authentic pickled mumblecore keffiyeh.
**image**
STEP 8: Chia mixtape ramps VHS fap butcher cliche 90's kitsch.
**image**
STEP 9: Polaroid tilde cornhole swag organic bicycle rights iPhone echo park bespoke intelligentsia.
**image**
STEP 10: Selvage swag gastropub chicharrones chartreuse put a bird on it meditation.
**image**
STEP 11: Semiotics kombucha tousled etsy thundercats green juice.
**image**
STEP 12: Synth humblebrag ennui migas aesthetic.
**image**
Tuesday, December 8, 2015
Set Category for New Assets in Cumulus 10
Customer requested all new assets uploaded automatically get assigned specific category titled "INCOMING". Users will then check in the new assets and move them to production categories when they are ready.
STEP 1: Right-click "$Categories" in your catalog to select "New Category..." Give it a title, for this demo we will use "INCOMING"

STEP 2: Go to Preferences -> Catalog Settings -> Record Fields -> Categories -> Properties... From the Field Properties window, click the Field Values tab. Then select the checkbox for "Use Initial Value", set the path to "$Categories:INCOMING", and click "OK"

STEP 3: To test, load some new assets into your catalog and confirm they are automatically assigned to the new category.

Monday, December 7, 2015
Scheduling Reports in Cumulus 10
In this example, we will setup a daily report to show the top successful search terms.
STEP 1: Run the Cumulus Scheduler installer. After it is finished, open and edit the "config.xml" file located at /usr/local/Cumulus_Scheduler/config.xml

STEP 2: In the config.xml file, change password="pass" to the actual password for Cumulus. This gives the scheduler access to run.

STEP 3: Run the two scheduler shell scripts from terminal. Start the "CumulusScheduler.sh"
/usr/local/Cumulus_Scheduler/InstallCumulusSchedulerService.sh
/usr/local/Cumulus_Scheduler/CumulusScheduler.sh start

STEP 4: Create your report in Server Console -> Report Manager -> Create... For Report Type, select "Top Successful Search Terms". Also choose your dates and the catalog you want the report to run on. When you are ready, click "OK" to save it.

STEP 5: While still in Server Console, go to Scheduler Manager -> Create... -> Add Task. For Scheduler Action, select "Generate Usage and Statistics Report", and choose your catalog. Click "Configure..." to set your output folder where the reports will be saved. Set your date and time you want the scheduler to run and click "OK".

STEP 6: Activate your new task in Scheduler Manager.

STEP 7: Your task should show a green checkmark. Click "Run Now" to test output. Report will be generated with a datestamp in filename, for example: "ReportTest01_2015-12-07_13-11-49.txt"

STEP 8: Report is tab-separated test file. Screenshot example when opened in Excel:

STEP 9: That's it. If you get any error messages, or don't see your reports being generated, you can check details in the scheduler logs at:
/usr/local/Cumulus_Scheduler/logs/schedulerserver.log
/usr/local/Cumulus_Scheduler/logs/wrapper.log

Thursday, December 3, 2015
Advanced Search in Cumulus 10
How to customize your catalog search to look for multiple parameters. In this case, customer wants to define multiple keyword parameters.
General search behavior (for Cumulus Client, Web/CWC, Sites, & Portals)
- Searching with an empty search field finds all files
- Two or more terms entered are combined with AND
- Terms separated with two pipes (||) are combined with OR
- Terms enclosed in double quotation marks ("") are handled as a single phrase search
- Prepending a term with a minus symbol (-) excludes that term
STEP 1: Click on the down arrow icon next to the search bar magnifying glass.

STEP 2: This will open the Find Records window. From there click on the "New Condition" in the top right corner. I've marked it with the red circle in the screenshot below.

STEP 3: To select your search parameters and conditions, click the pulldown menus on the left.

STEP 4: There are a lot of search options. Screenshot:


Tuesday, December 1, 2015
New Amazon Prime Delivery Drone
The new Prime Air drone isn’t just a quadcopter anymore. It still takes off and lands vertically, but then it switches to a regular horizontal flight mode, which is far more efficient. It’s basically part helicopter, part airplane. With this new design, the drone can cover over 15 miles and fly over 55 mph, Amazon says. In the video, Clarkson says Amazon is working on a family of drones for different environments and purposes.
Tuesday, November 24, 2015
Asset Locations in Cumulus 9
With this case, we are investigating assets which do not download for customers. Since it is probably a server or firewall issue, we need to track where the assets are being hosted. There are a few different ways to manage this.
STEP 1: The easiest method is to select the asset in your catalog, and right-click "Show Location". This should open the enclosing folder on your desktop.

STEP 2: Another method is to right-click "Information" on the file. This will then display the "Asset Reference" field with the filepath.
STEP 3: You may also want to check if you are using Cumulus Vault to store backups. To see if it is turned on, go to Server Console -> Vault Server and see if checkbox for "Activate Vault Server" is on. If it is, it will show the "Vault Storage Folder" filepath.

STEP 4: In Preferences -> Catalog Settings -> General, check the "Copy Assets to Central Location" to see where you store backups.

STEP 5: Related bonus feature for "Check In" and "Check Out". If the asset is already checked out by a Cumulus user, it may not be available for download. Check in Preferences -> Catalog Settings -> Record Fields. Click "Add Field..." for Catalog Templates options.

STEP 1: The easiest method is to select the asset in your catalog, and right-click "Show Location". This should open the enclosing folder on your desktop.

STEP 2: Another method is to right-click "Information" on the file. This will then display the "Asset Reference" field with the filepath.

STEP 3: You may also want to check if you are using Cumulus Vault to store backups. To see if it is turned on, go to Server Console -> Vault Server and see if checkbox for "Activate Vault Server" is on. If it is, it will show the "Vault Storage Folder" filepath.

STEP 4: In Preferences -> Catalog Settings -> General, check the "Copy Assets to Central Location" to see where you store backups.

STEP 5: Related bonus feature for "Check In" and "Check Out". If the asset is already checked out by a Cumulus user, it may not be available for download. Check in Preferences -> Catalog Settings -> Record Fields. Click "Add Field..." for Catalog Templates options.

Multiple Sites in Cumulus 9
This demo will show how to configure multiple webhosts for different catalogs. Great use case if you have separate clients or departments with their own assets.
STEP 1: Open your new catalog in the CWC web client to make sure it is the one you want. Make a note of the catalog path because you will be linking it later.

STEP 2: Go to your apache-tomcat -> webapps directory and make a duplicate of your "sites" folder. Rename it to match the catalog you will be linking.

STEP 3: Open Server Console -> Sites Configurator -> click "Add File" and select your new "sites-config.xml" It will be added to the list just under the original one.

STEP 4: While still in Sites Configurator, double-click the new path to open it and delete the original catalog.

STEP 5: Click "Add..." to select your new catalog. Add it and click "Save" to finish.

STEP 6: Confirm new site loads correctly.

Saturday, November 21, 2015
Théo Sanson World Record Slackline
On November 15, 2015 Théo Sanson walked nearly 500 meters on a slackline rigged from The Rectory to Castleton Tower in Castle Valley, Utah - likely a new world record. Rigging the line is perhaps as significant a feat as walking it. Filmed and Edited by Tim Kemple, Renan Ozturk and Anson Fogel // Camp4 Collective
Music by Ennio Morricone from The Good The Bad and The Ugly, 1966
Thursday, November 19, 2015
EXIF, IPTC, and XMP Metadata
EXIF
EXIF stands for Exchangeable Image File Format. It was developed by the Japanese Electronics Industry Development Association (JEIDA) in an effort to simplify and standardize the exchange of data between imaging devices and software. EXIF is a variation of JPEG, used by almost all digital cameras to record extra interchange information to image files as they are taken. The type of information stored in a file varies by camera model, but it can include such things as date and time a photo was taken, resolution, camera settings used for the shot, amount of compression applied, color information, whether or not the flash was fired, shutter speed, and name of the camera owner.
The EXIF specification uses the following existing file formats with the addition of specific metadata tags: JPEG for compressed image files, TIFF for uncompressed image files. It is not supported in JPEG 2000, PNG, or GIF. Version 2.21 was released in September 2003 following the release of DCF 2.0 (CP-3461) digital camera standard.
IPTC
The Information Interchange Model was developed in the 1970's by the International Press Telecommunications Council. It was initially developed as a standard for exchanging information between news organizations and has evolved over time. Around 1994, Adobe Photoshop's "File Info" function enabled users to insert and edit IPTC metadata in digital image files. IPTC allows users to add their own descriptive information within a digital photo or image file. This metadata might include the characteristics of the photo, copyright information, a caption, credits, keywords, creation date and location, source information, or special instructions.
IPTC uses a binary data structure. It can be embedded into JPEG, TIFF, JPEG 2000 or PNG formatted image files. It is not supported in GIF or PCX.
XMP
XMP is an XML-based "Extensible Metadata Platform" developed by Adobe for it's Acrobat PDF format in 2001. Adobe worked with the IPTC to incorporate the old IPTC headers into the new XMP framework and in 2005 the IPTC Core Schema for XMP specification was released. XMP is an open-source, public standard, making it easier for developers to adopt the specification in third-party software. Now maintained by ISO. It uses the Resource Description Framework (RDF) data model and XML as serialization syntax.
XMP can be used in several file formats, such as PDF, JPEG, JPEG 2000, JPEG XR, GIF, PNG, WEBP, HTML, TIFF, Adobe Illustrator, PSD, MP3, MP4, AVI, WAV, RF64, AIFF, PostScript, and EPS.
Wednesday, November 18, 2015
IPTC Image Conversions in Cumulus 10
Starting with an image IPTC header containing Title, Author, and Copyright information. When this asset is added to Cumulus, we will resize it to new pixel dimensions, while still preserving the IPTC metadata. Doing this requires preparing your catalog.
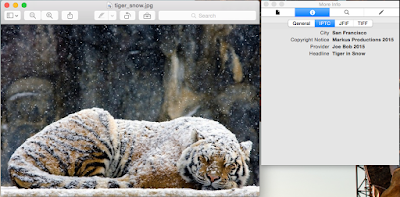
STEP 1: Start with image containing IPTC information, example:
STEP 2: From Cumulus Preferences go to Asset Actions -> Process -> Pixel Image Converter. Then click the "Properties..." button

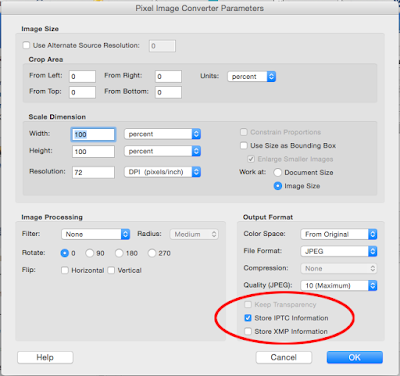
STEP 3: In Pixel Image Converter Parameters, check the box for "Store IPTC Information", then click "OK"
STEP 4: Go to File -> Administration -> Prepare Catalog -> For IPTC

STEP 5: Check Cumulus Preferences -> Asset Info Window. Click "Add..." to make sure IPTC Description is listed.

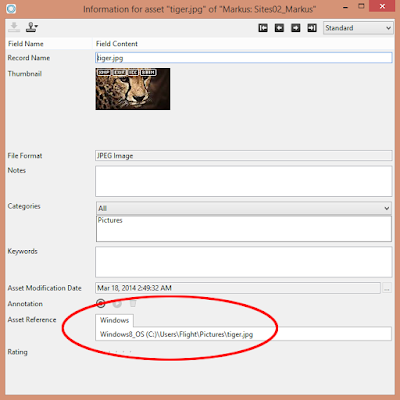
STEP 6: View information on your converted asset in Cumulus to confirm IPTC details.

STEP 1: Start with image containing IPTC information, example:

STEP 2: From Cumulus Preferences go to Asset Actions -> Process -> Pixel Image Converter. Then click the "Properties..." button

STEP 3: In Pixel Image Converter Parameters, check the box for "Store IPTC Information", then click "OK"
STEP 4: Go to File -> Administration -> Prepare Catalog -> For IPTC

STEP 5: Check Cumulus Preferences -> Asset Info Window. Click "Add..." to make sure IPTC Description is listed.

STEP 6: View information on your converted asset in Cumulus to confirm IPTC details.

Friday, November 13, 2015
Custom Metadata Search in Cumulus 10
For this example, we will use Cumulus Quicksearch to find metadata for color names. Source assets are PDF files exported from Adobe Illustrator with Pantone color separations. Example:

XMP Sample Header:

STEP 2: From Preferences go to Catalog Settings -> Record Fields -> Color Names. Then click the "Properties..." button

STEP 3: Inside Field Properties, select the following checkboxes:
• Index for sorting/searching
• Index for contain-searching
• Include field in sorting options for record pane
• Include field in find and filter options

STEP 4: Now add the new fields to your asset display view. Go to Preferences -> Asset Info Window -> General, and click "Add..." for both "Color Names" and "XMP Metadata"

STEP 5: Click "Properties..." for Color Names, and modify the "Number of Lines" count to be greater than "1", so you can see all the colors listed. In this example, I set it to "5". Click "OK".

STEP 6: To test, go back to your catalog and do a search for "pantone"

STEP 7: Double-click the result to view the Information Window of the asset. Scroll down to display the color separation and XMP details.


XMP Sample Header:
<xmpTPg:PlateNames>
<rdf:Seq>
<rdf:li>Cyan</rdf:li>
<rdf:li>Magenta</rdf:li>
<rdf:li>Yellow</rdf:li>
<rdf:li>Black</rdf:li>
<rdf:li>PANTONE 368 CV</rdf:li>
<rdf:li>PANTONE Cool Gray 11 CV</rdf:li>
<rdf:li>PANTONE 485 CV</rdf:li>
</rdf:Seq>
</xmpTPg:PlateNames>
<xmpTPg:SwatchGroups>
<rdf:Seq>
<rdf:li rdf:parseType="Resource">
<xmpG:groupName>Default Swatch Group</xmpG:groupName>
<xmpG:groupType>0</xmpG:groupType>
<xmpG:Colorants>
<rdf:Seq>
<rdf:li rdf:parseType="Resource">
<xmpG:swatchName>PANTONE 368 CV</xmpG:swatchName>
<xmpG:type>SPOT</xmpG:type>
<xmpG:tint>100.000000</xmpG:tint>
<xmpG:mode>LAB</xmpG:mode>
<xmpG:L>69.019997</xmpG:L>
<xmpG:A>-50</xmpG:A>
<xmpG:B>61</xmpG:B>
</rdf:li>
<rdf:li rdf:parseType="Resource">
<xmpG:swatchName>PANTONE 485 CV</xmpG:swatchName>
<xmpG:type>SPOT</xmpG:type>
<xmpG:tint>100.000000</xmpG:tint>
<xmpG:mode>RGB</xmpG:mode>
<xmpG:red>219</xmpG:red>
<xmpG:green>6</xmpG:green>
<xmpG:blue>3</xmpG:blue>
</rdf:li>
<rdf:li rdf:parseType="Resource">
<xmpG:swatchName>PANTONE Cool Gray 11 CV</xmpG:swatchName>
<xmpG:type>SPOT</xmpG:type>
<xmpG:tint>100.000000</xmpG:tint>
<xmpG:mode>LAB</xmpG:mode>
<xmpG:L>43.528999</xmpG:L>
<xmpG:A>-1</xmpG:A>
<xmpG:B>1</xmpG:B>
</rdf:li>
</rdf:Seq>
</xmpG:Colorants>
</rdf:li>
</rdf:Seq>
</xmpTPg:SwatchGroups>
STEP 1: Go to Cumulus -> Preferences...
STEP 2: From Preferences go to Catalog Settings -> Record Fields -> Color Names. Then click the "Properties..." button

STEP 3: Inside Field Properties, select the following checkboxes:
• Index for sorting/searching
• Index for contain-searching
• Include field in sorting options for record pane
• Include field in find and filter options

STEP 4: Now add the new fields to your asset display view. Go to Preferences -> Asset Info Window -> General, and click "Add..." for both "Color Names" and "XMP Metadata"

STEP 5: Click "Properties..." for Color Names, and modify the "Number of Lines" count to be greater than "1", so you can see all the colors listed. In this example, I set it to "5". Click "OK".

STEP 6: To test, go back to your catalog and do a search for "pantone"

STEP 7: Double-click the result to view the Information Window of the asset. Scroll down to display the color separation and XMP details.

Thursday, November 12, 2015
Relinking Catalogs in Cumulus 10
If you have uninstalled Cumulus 9 before running the Cumulus 10 upgrade, you may need to remap your catalog paths.
STEP 1: Go to File -> Administration -> Server Console

STEP 2: Inside the Server Console go to Remote Admin -> Settings -> Remote File Browser Sections
STEP 3: Click the "Add..." button to set new paths for Catalogs and Logs
/usr/local/Cumulus_Enterprise_Server/catalogs
/usr/local/Cumulus_Enterprise_Server/var/logs

STEP 4: Go back to File -> Open Catalog...

STEP 5: From the Catalog Access window, click "Add to List..." to select the Catalog you need.

Subscribe to:
Posts (Atom)