"The United States government has demanded that Apple take an unprecedented step which threatens the security of our customers. We oppose this order, which has implications far beyond the legal case at hand."
"This moment calls for public discussion, and we want our customers and people around the country to understand what is at stake." -- Tim Cook, A Message to Our Customers
From http://yro.slashdot.org/comments.pl?sid=8756397&cid=51524693
iPhones do typically use a 4-6 digit pin as an unlock code. The user also has the ability to create a full alphanumeric password for the unlock code as well. However, that is simply the code that's used to unlock the actual full encryption key that is stored within dedicated crypto hardware. Apple uses a dedicated chip to store and process the encryption. They call this the Secure Enclave. The secure enclave stores a full 256-bit AES encryption key.
Within the secure enclave itself, you have the device's Unique ID (UID) . The only place this information is stored is within the secure enclave. It can't be queried or accessed from any other part of the device or OS. Within the phone's processor you also have the device's Group ID (GID). Both of these numbers combine to create 1/2 of the encryption key. These are numbers that are burned into the silicon, aren't accessible outside of the chips themselves, and aren't recorded anywhere once they are burned into the silicon. Apple doesn't keep records of these numbers. Since these two different pieces of hardware combine together to make 1/2 of the encryption key, you can't separate the secure enclave from it's paired processor.
The second half of the encryption key is generated using a random number generator chip. It creates entropy using the various sensors on the iPhone itself during boot (microphone, accelerometer, camera, etc.) This part of the key is stored within the Secure Enclave as well, where it resides and doesn't leave. This storage is tamper resistant and can't be accessed outside of the encryption system. Even if the UID and GID components of the encryption key are compromised on Apple's end, it still wouldn't be possible to decrypt an iPhone since that's only 1/2 of the key.
The secure enclave is part of an overall hardware based encryption system that completely encrypts all of the user storage. It will only decrypt content if provided with the unlock code. The unlock code itself is entangled with the device's UDID so that all attempts to decrypt the storage must be done on the device itself. You must have all 3 pieces present: The specific secure enclave, the specific processor of the iphone, and the flash memory that you are trying to decrypt. Basically, you can't pull the device apart to attack an individual piece of the encryption or get around parts of the encryption storage process. You can't run the decryption or brute forcing of the unlock code in an emulator. It requires that the actual hardware components are present and can only be done on the specific device itself.
The secure enclave also has hardware enforced time-delays and key-destruction. You can set the phone to wipe the encryption key (and all the data contained on the phone) after 10 failed attempts. If you have the data-wipe turned on, then the secure enclave will nuke the key that it stores after 10 failed attempts, effectively erasing all the data on the device. Whether the device-wipe feature is turned on or not, the secure enclave still has a hardware-enforced delay between attempts at entering the code: Attempts 1-4 have no delay, Attempt 5 has a delay of 1 minute. Attempt 6 has a delay of 5 minutes. Attempts 7 and 8 have a delay of 15 minutes. And attempts 9 or more have a delay of 1 hour. This delay is enforced by the secure enclave and can not be bypassed, even if you completely replace the operating system of the phone itself. If you have a 6-digit pin code, it will take, on average, nearly 6 years to brute-force the code. 4-digit pin will take almost a year. if you have an alpha-numeric password the amount of time required could extend beyond the heat-death of the universe. Key destruction is turned on by default.
Even if you pull the flash storage out of the device, image it, and attempt to get around key destruction that way it won't be successful. The key isn't stored in the flash itself, it's only stored within the secure enclave itself which you can't remove the storage from or image it.
Each boot, the secure enclave creates it's own temporary encryption key, based on it's own UID and random number generator with proper entropy, that it uses to store the full device encryption key in ram. Since the encryption key is also stored in ram encrypted, it can't simply be read out of the system memory by reading the RAM bus.
The only way I can possibly see to potentially unlock the phone without the unlock code is to use an electron microscope to read the encryption key from the secure enclave's own storage. This would take considerable time and expense (likely millions of dollars and several months) to accomplish. This also assumes that the secure enclave chip itself isn't built to be resistant to this kind of attack. The chip could be physically designed such that the very act of exposing the silicon to read it with an electron microscope could itself be destructive.
Source: https://www.apple.com/business/docs/iOS_Security_Guide.pdf
Wednesday, February 17, 2016
Thursday, February 11, 2016
Using Check Out Feature in Cumulus
Today we will show all the steps for configuring your catalog to allow users to "check in" and "check out" assets. The first five steps are for setting Cumulus vault to support multiple versions of an asset. The last four focus on "Fields for Asset Version Control" which is the feature that enables check out.
STEP 1: Go to Server Console -> Vault Server, and turn on checkbox for "Activate Vault Server". For Vault Storage Folder, enter the filepath to where your vault files will be backed up. To keep the filesystem nice and tidy, set "Create a New Folder After" to 7 days. Click "Save Changes", and go back to the Cumulus native client.

STEP 2: Open Preferences -> Catalog Settings -> General. Turn on checkbox for "Use Central Asset Location" and click "Browse.." button, select "Vault AssetStore" and click "OK"

STEP 3: For Select Remote Module, type in "localhost" if your vault storage location is on the same machine. If it is on another computer or device, choose the DNS name or IP address.

STEP 4: Next, in the "Choose an Asset Location" window, turn on "Use Vault Folder", and click "New Folder.." to select your catalog.

STEP 5: For Mode option, choose "Always" if you want to keep backup copy of assets in vault even if the record is deleted. Or, if you want vault backup copies deleted when record is deleted, then choose "Always and exclusive". Turn on checkboxes for "Share Catalog" and "Allow Web access"

STEP 6: Go to the Record Fields tab, next to General. Click on "Add Field.." and go to Modules -> Catalog Templates, and select "Fields for Asset Version Control", and click "OK"

This will automatically add 4 record fields for Check out Date, Location, User, and User ID (highlighted in screenshot below)

STEP 7: Go to Preferences -> Asset Handling Sets -> Modules -> Asset Storage. Select "Vault AssetStore" and click "Activate" Click "Apply" and "OK" to close Preferences.

STEP 8: To set the check out destination path in your filesystem, go to Preferences -> User Settings -> General -> Application. Turn on checkbox for "Use Checkout Location" and click the 3 dots [...] to select the folder.

STEP 9: Final step, back in your catalog, double-click an asset to open the information window. You should see the new vault path in the "Asset Reference" field.

When you right-click assets in your catalog, you will now see "Check Out.." option is available.

STEP 1: Go to Server Console -> Vault Server, and turn on checkbox for "Activate Vault Server". For Vault Storage Folder, enter the filepath to where your vault files will be backed up. To keep the filesystem nice and tidy, set "Create a New Folder After" to 7 days. Click "Save Changes", and go back to the Cumulus native client.

STEP 2: Open Preferences -> Catalog Settings -> General. Turn on checkbox for "Use Central Asset Location" and click "Browse.." button, select "Vault AssetStore" and click "OK"

STEP 3: For Select Remote Module, type in "localhost" if your vault storage location is on the same machine. If it is on another computer or device, choose the DNS name or IP address.

STEP 4: Next, in the "Choose an Asset Location" window, turn on "Use Vault Folder", and click "New Folder.." to select your catalog.

STEP 5: For Mode option, choose "Always" if you want to keep backup copy of assets in vault even if the record is deleted. Or, if you want vault backup copies deleted when record is deleted, then choose "Always and exclusive". Turn on checkboxes for "Share Catalog" and "Allow Web access"

STEP 6: Go to the Record Fields tab, next to General. Click on "Add Field.." and go to Modules -> Catalog Templates, and select "Fields for Asset Version Control", and click "OK"

This will automatically add 4 record fields for Check out Date, Location, User, and User ID (highlighted in screenshot below)

STEP 7: Go to Preferences -> Asset Handling Sets -> Modules -> Asset Storage. Select "Vault AssetStore" and click "Activate" Click "Apply" and "OK" to close Preferences.

STEP 8: To set the check out destination path in your filesystem, go to Preferences -> User Settings -> General -> Application. Turn on checkbox for "Use Checkout Location" and click the 3 dots [...] to select the folder.

STEP 9: Final step, back in your catalog, double-click an asset to open the information window. You should see the new vault path in the "Asset Reference" field.

When you right-click assets in your catalog, you will now see "Check Out.." option is available.


Monday, February 8, 2016
Custom Metadata Editor in Cumulus
By default, Cumulus will ingest any asset and allow you to edit after it is in the catalog. Here we will show you how to create a custom form to enter metadata at the time new assets are uploaded. This is useful for submitting "mandatory fields" such as tracking or SKU numbers which must be entered before the asset is saved.
STEP 1: First open Cumulus Preferences -> Asset Handling Sets -> Cataloging. Make sure your view sets match (circled in screenshot) so you are not accidentally editing a different view set. Click on the checkboxes for both "Show Metadata Editor for new records" and "Show Metadata Editor for updated records"

STEP 2: While still in Preferences, go to Record View Sets -> Asset Info Window and click "Add.." to select your new custom fields. In this screenshot, I've used the example "SKU" as a user-editable mandatory field. Once you are finished, click "Apply" and "OK" to save them.

STEP 3: Back in Cumulus, add some new asset files to your catalog to test. Please make sure you are using the same asset handling set you just modified when the option pops up. Click "OK"

STEP 4: Next you should see the metadata editor for your new asset. You may edit here, and then click "Save" when finished to submit the new asset to your catalog.

STEP 1: First open Cumulus Preferences -> Asset Handling Sets -> Cataloging. Make sure your view sets match (circled in screenshot) so you are not accidentally editing a different view set. Click on the checkboxes for both "Show Metadata Editor for new records" and "Show Metadata Editor for updated records"

STEP 2: While still in Preferences, go to Record View Sets -> Asset Info Window and click "Add.." to select your new custom fields. In this screenshot, I've used the example "SKU" as a user-editable mandatory field. Once you are finished, click "Apply" and "OK" to save them.

STEP 3: Back in Cumulus, add some new asset files to your catalog to test. Please make sure you are using the same asset handling set you just modified when the option pops up. Click "OK"

STEP 4: Next you should see the metadata editor for your new asset. You may edit here, and then click "Save" when finished to submit the new asset to your catalog.

Hiding $Categories in Cumulus Web Client
Cumulus traditionally stores new user Categories inside $Categories, a legacy convention from earlier versions. The $Categories are required by the Cumulus database, but can be hidden. Many customers request this, to cleanup the application view to only show their custom categories. This walkthrough shows how to do it.
STEP 1: Go to Cumulus Preferences -> Category View Sets -> Category Pane. Check the box to "Restrict selectable master categories to" and "$Categories". This removes the extra $Keywords and $Sources from the Category View Pane.

STEP 2: Right-click "$Categories" from the left side navbar, and select "Information". In the view set dropdown, choose "Customize".

STEP 3: This will open up the Preferences pane, make sure you are in the "Standard" view set. Then click "Add", and choose "Container Type [String List]".

STEP 4: While still in Preferences, go to Catalog Settings -> Category Fields -> Container Type. Right-click to enable "Allow user to edit" so that green checkmark shows in "User Editable" column. Click "Apply" and "OK" to go back to Cumulus.

STEP 5: Right-click "$Categories" again, and change Container Type to "no value". Then click the save icon in upper left.

STEP 6: Move your custom category is placed on the master level of your catalog, then right-click it show information. Set Container Type to "Category", and click the save icon. These will be the categories you see in your web client, now that $Categories has been hidden.

STEP 7: Confirm everything is working by opening the web client. The only containers listed should be your custom categories.

STEP 1: Go to Cumulus Preferences -> Category View Sets -> Category Pane. Check the box to "Restrict selectable master categories to" and "$Categories". This removes the extra $Keywords and $Sources from the Category View Pane.

STEP 2: Right-click "$Categories" from the left side navbar, and select "Information". In the view set dropdown, choose "Customize".

STEP 3: This will open up the Preferences pane, make sure you are in the "Standard" view set. Then click "Add", and choose "Container Type [String List]".

STEP 4: While still in Preferences, go to Catalog Settings -> Category Fields -> Container Type. Right-click to enable "Allow user to edit" so that green checkmark shows in "User Editable" column. Click "Apply" and "OK" to go back to Cumulus.

STEP 5: Right-click "$Categories" again, and change Container Type to "no value". Then click the save icon in upper left.

STEP 6: Move your custom category is placed on the master level of your catalog, then right-click it show information. Set Container Type to "Category", and click the save icon. These will be the categories you see in your web client, now that $Categories has been hidden.

STEP 7: Confirm everything is working by opening the web client. The only containers listed should be your custom categories.

Friday, January 15, 2016
Formula Functions for Cumulus 10
var ( variable-name [, value ] )
This pseudo-function either sets a variable to a given value or returns the current variable value. A variable can be get and set multiple times.
The last formula expression (following the var() setter functions) then returns the value of the whole expression. There is no specific separator necessary after each var() setter function.
Returns: The variable value
subtableitems ( result-table-spec, query-string, sort-fields, sort-directions, limit-offset, limit-count )
Returns a "collection" type value that can be used as parameter to other functions (but not as a field value). The collection is created for the given result-table-spec containing items that match the given query.
The collection is then sorted by the given sort fields (comma-separated list of field-specs) and the sort-directions (comma-separated list of "ascending"/"descending". The collection is then limited to only contain up to limit-count items starting at offset limit-offset.
The result-table-spec needs to be a sub-table of the current item's table because the query is always extended with a condition to match the item ID as the "Host Item ID".
Returns: The collection object
itembyindex ( collection-object, index )
Returns an "item" type value that can be used as parameter to other functions (but not as a field value). The index parameter specifies the index of the item inside the collection object specified. An index of 0 returns the first item, 1 the second item, etc. A negative index returns an item counting from the end of the collection: -1 returns the last item, -2 the item before the last one etc.
Returns: The item object (or null if there is no such item)
fieldvalue ( field-spec [, item-object] [, as-string] )
Variant of the existing function that returns the value of the field specified for the given item object. The item object is the result of the itembyindex() function.
Returns: The field value (any type)
fieldhasvalue ( field-spec [, item-object])
Variant of the existing function that returns whether the field specified for the given item object has a value or not. The item object is the result of the itembyindex() function.
Returns: A boolean telling whether the field has a value or not
sum (collection-object, field-spec)
Calculates the sum of all values in the field specified by "field-spec" in all items of the "collection-object". Empty field values are skipped.
Returns: The sum of all values (integer or real)
average (collection-object, field-spec)
Calculates the average of all values in the field specified by "field-spec" in all items of the "collection-object". Empty field values are skipped. For Rating type fields the average needs to build the average of the number of stars whereas the field value itself is just the ID.
Returns: The average value (integer or real)
median (collection-object, field-spec)
Picks the median of all values in the field specified by "field-spec" in all items of the "collection-object". Empty field values are skipped.
Returns: The median value (integer or real)
min (collection-object, field-spec)
Variant of the existing function that calculates the minimum of all values in the field specified by "field-spec" in all items of the "collection-object". Empty field values are skipped.
Returns: The minimum value (integer or real)
max (collection-object, field-spec)
Variant of the existing function that calculates the maximum of all values in the field specified by "field-spec" in all items of the "collection-object". Empty field values are skipped.
Returns: The maximum value (integer or real)
count (collection-object)
Count the number of items of the "collection-object".
Returns: The number of items (integer)
This pseudo-function either sets a variable to a given value or returns the current variable value. A variable can be get and set multiple times.
The last formula expression (following the var() setter functions) then returns the value of the whole expression. There is no specific separator necessary after each var() setter function.
Returns: The variable value
subtableitems ( result-table-spec, query-string, sort-fields, sort-directions, limit-offset, limit-count )
Returns a "collection" type value that can be used as parameter to other functions (but not as a field value). The collection is created for the given result-table-spec containing items that match the given query.
The collection is then sorted by the given sort fields (comma-separated list of field-specs) and the sort-directions (comma-separated list of "ascending"/"descending". The collection is then limited to only contain up to limit-count items starting at offset limit-offset.
The result-table-spec needs to be a sub-table of the current item's table because the query is always extended with a condition to match the item ID as the "Host Item ID".
Returns: The collection object
itembyindex ( collection-object, index )
Returns an "item" type value that can be used as parameter to other functions (but not as a field value). The index parameter specifies the index of the item inside the collection object specified. An index of 0 returns the first item, 1 the second item, etc. A negative index returns an item counting from the end of the collection: -1 returns the last item, -2 the item before the last one etc.
Returns: The item object (or null if there is no such item)
fieldvalue ( field-spec [, item-object] [, as-string] )
Variant of the existing function that returns the value of the field specified for the given item object. The item object is the result of the itembyindex() function.
Returns: The field value (any type)
fieldhasvalue ( field-spec [, item-object])
Variant of the existing function that returns whether the field specified for the given item object has a value or not. The item object is the result of the itembyindex() function.
Returns: A boolean telling whether the field has a value or not
sum (collection-object, field-spec)
Calculates the sum of all values in the field specified by "field-spec" in all items of the "collection-object". Empty field values are skipped.
Returns: The sum of all values (integer or real)
average (collection-object, field-spec)
Calculates the average of all values in the field specified by "field-spec" in all items of the "collection-object". Empty field values are skipped. For Rating type fields the average needs to build the average of the number of stars whereas the field value itself is just the ID.
Returns: The average value (integer or real)
median (collection-object, field-spec)
Picks the median of all values in the field specified by "field-spec" in all items of the "collection-object". Empty field values are skipped.
Returns: The median value (integer or real)
min (collection-object, field-spec)
Variant of the existing function that calculates the minimum of all values in the field specified by "field-spec" in all items of the "collection-object". Empty field values are skipped.
Returns: The minimum value (integer or real)
max (collection-object, field-spec)
Variant of the existing function that calculates the maximum of all values in the field specified by "field-spec" in all items of the "collection-object". Empty field values are skipped.
Returns: The maximum value (integer or real)
count (collection-object)
Count the number of items of the "collection-object".
Returns: The number of items (integer)
Wednesday, January 13, 2016
Trimming MP4 with MPEG Streamclip
An excellent feature of MPEG Streamclip is trimming MP4 video without re-encoding. This is great for preserving high quality compression when you simply need to cut down the video duration.
STEP 1: Scrub to your in point "Go To Keyframe" edit option to lock to next I-Frame and set in point. Do the same for your out point. This prevents the pixel smear you would see from cutting on P or B-Frames.

STEP 2: Click File -> Save As... to write new file with a clean MP4 wrapper.

STEP 1: Scrub to your in point "Go To Keyframe" edit option to lock to next I-Frame and set in point. Do the same for your out point. This prevents the pixel smear you would see from cutting on P or B-Frames.

STEP 2: Click File -> Save As... to write new file with a clean MP4 wrapper.

Thursday, January 7, 2016
Restricting Category Access in Cumulus
If you need to restrict a user to one category, you can use the Live Filtering feature in Cumulus user permissions.
STEP 1: In this example, I create a new category called "Texans", and then do a custom search for "Categories" -> "Contains" -> "Texans". This will restrict results to show only assets in the new category. Use the pulldown menu on the upper left to save your query.

STEP 2: When saving, click the checkbox for "Share Query", this will make it available for other users.

STEP 3: Go to Server Console -> User Manager -> (Select User) -> Properties -> Catalog Permissions. Enable general access to the catalog, then scroll down to Live Filtering. Click checkboxes for "Use Category Live Filtering" and "Use Record Live Filtering"

STEP 4: Click the "Use Query" button, and select the search query you created earlier. Set for both "Use Category Live Filtering" and "Use Record Live Filtering" then click "OK" twice to save your new user settings. Return to Cumulus, login as the restricted user, and you will see only the restricted category.

STEP 1: In this example, I create a new category called "Texans", and then do a custom search for "Categories" -> "Contains" -> "Texans". This will restrict results to show only assets in the new category. Use the pulldown menu on the upper left to save your query.
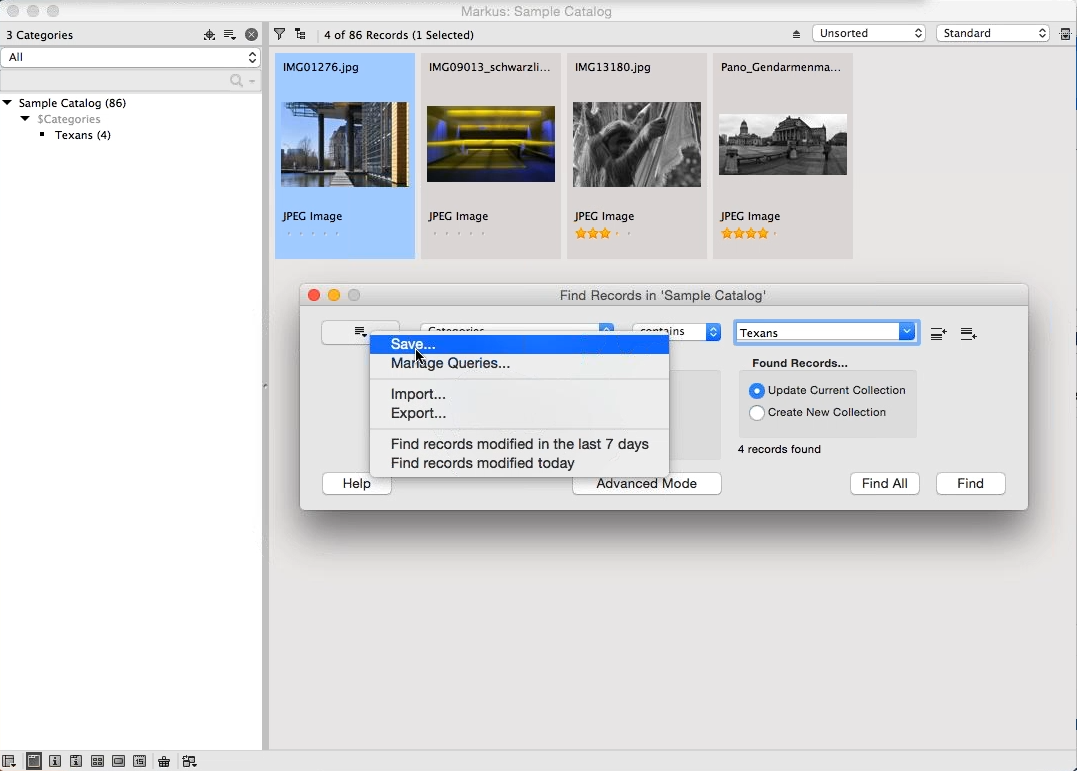
STEP 2: When saving, click the checkbox for "Share Query", this will make it available for other users.

STEP 3: Go to Server Console -> User Manager -> (Select User) -> Properties -> Catalog Permissions. Enable general access to the catalog, then scroll down to Live Filtering. Click checkboxes for "Use Category Live Filtering" and "Use Record Live Filtering"

STEP 4: Click the "Use Query" button, and select the search query you created earlier. Set for both "Use Category Live Filtering" and "Use Record Live Filtering" then click "OK" twice to save your new user settings. Return to Cumulus, login as the restricted user, and you will see only the restricted category.

Subscribe to:
Posts (Atom)